Facebook Guide
Posts Tagged Lists
How to Limit What Certain Friends See On Facebook Using Friend Lists
With lists, you can create groups of friends on Facebook, separating work from family and close friends. It’s simple to use, but it’s definitely an underutilized feature. In fact, most of the people who spend their days “Facebooking,” never seem to take the time to worry about who’s seeing what.
How To Use Friend Lists
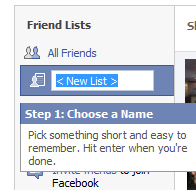
To get started with Facebook Lists, you first need to build one. You can do this from your Friends page. (Click “Friends” in the blue bar at the top). On the left side of the page, click the button “Make a New List.” Give it a title.
Now you’ll have the option to add your friends to the list. You can either start typing in names one by one or click on “Select Multiple Friends” to add several people to the list all at once. (To add people, just click on their photos.) When you’re finished, click the “Save List” button at the bottom.

Once you have some lists created, it’s time to figure out who gets to see what. To edit your privacy settings, go to “Settings” at the top-right of the screen next to the search box. When you hover your mouse over the link, you’ll see a menu appear; click “Privacy Settings”on this menu. On the following page, click “Profile,” the top choice in the list of options.
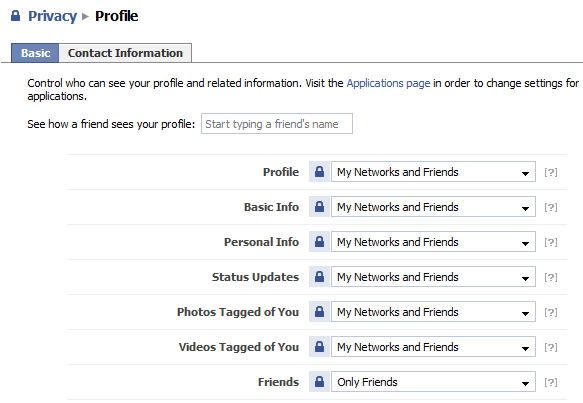
On the profile privacy page, you have the option of customizing exactly who gets to see what. You can modify the following areas: Profile, Basic Info, Personal Info, Status Updates, Photos Tagged of You, Videos Tagged of You, Friends, Wall Posts, Education Info, and Work Info. If you’re unsure of what any of those things are, click the “?” next to the item to read a definition.

Using the drop-down boxes, you can customize who gets to see your info: “Only Friends,” “Friends of Friends,” or “My Network of Friends.” To lock down your profile to friends only, you could set all these to “only friends.” But since you have now created specialized lists, you’ll want to use these instead.
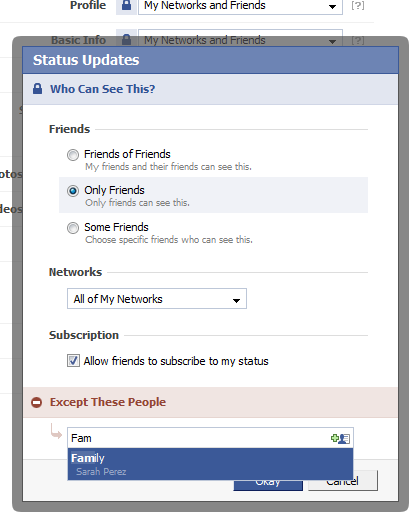
To do so, click the fourth option from the drop-down box: “Customize.” From here, you can add lists of people who should NOT be able to see this part of your profile. For example, if you wanted to block a list of work colleagues or those in your family from seeing your status updates, you could do so here – just type the name of your list in the box “Except these people” and save your changes.
Note: you can also block certain people individually just by typing in their names, but given the ever-growing number of Facebook users, you’re probably going to need a Friend List at some point. We recommend biting the bullet and creating your lists now instead of treating everyone as a one-off.

After you’ve saved your changes, you’re done. You’ll have your privacy back without having to change the way you and your friends use Facebook. Of course, keep in mind that nothing is foolproof – determined hackers can gain access to your account as can anyone who guesses your password….so maybe you shouldn’t use your dog’s name.
When lists are finally in place, you can assign new friends to a list right when you’re accepting their friend request – just look for the option “Add to Friend List” before you click “Accept.”
It may seem like quite a bit of work to set up, but you’ll thank yourself for doing this later…like every Monday morning when you go back to work after a great weekend…or the next time you need to borrow money from mom and dad. You get the idea. Better safe than sorry.
